Friday, October 31, 2008

The Art of Pumpkin Carving

I'm starting to be known as the one who always has the great jack-o-lanterns. This year I took the easy route with a simple carving (hard to do it with a 2-year-old running around). But the truth is, if you can draw, you can carve a unique pumpkin. There are a couple things to keep in mind, though:

1) Pumpkin carving is a lot like using white charcoal on black paper - you start with a black background and carve away the light parts. If you want to carve something dark, like a black cat, you have to surround it with something light, like a full moon. This year, I carved a slight variation of my Moonrise Message, a raven silhouetted against a full moon.

2) Also important to keep in mind is that you can have a light patch by itself, but all dark patches must be connected to another one and ultimately to the rest of the pumpkin. Otherwise, the piece will just fall out. This can be tricky. Last year (and I really wish I had a good photo of it) I carved a tiger face. It was quite a challenge making sure all the stripes and the nose and eyes were all connected.

3) Carve the details first, and make sure the thickness of the pumpkin wall works with the level of detail. A simple jack-o-lantern face can get away with thick walls, but if you have very thin parts, like branches or a raven's beak, a thinner wall is necessary (otherwise, the thickness can be misconstrued as part of the design). By carving out the details first, you have more of the support of the rest of the pumpkin to keep the piece steady. And carve away large blocks last, pulling out smaller portions at a time instead of the whole thing at once. For my raven, I carved between the legs and the small holes between the branches first, then the border of the bird, then as I started around the moon I pulled out wedges until I completed the whole moon area.

4) Achieve a range of light values by carving only part-way through the rind from the outside. This is even more like using white charcoal on black paper. The deeper you carve, the more light shows through. A shallower cut will block more light. I'm going to try this next year, I just ran out of time for a design this year.

Happy Halloween, Samhain, All Hallow's Eve, All Saints Day, Day of the Dead, or whatever you are celebrating this weekend!
Wednesday, October 29, 2008

WIP - Lion Pyrography Update

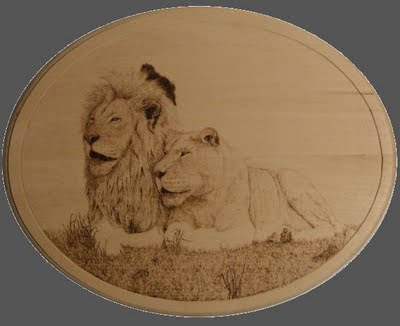
two lions pyrography in progress
After taking some time off from this for a commission, I did quite a bit today. The grass was done with the writing pen, which is shaped like a loop. (I will write about the pens in a later post.) The process is the same as if I were drawing grass with a pencil, except the pyrography pen is thicker. I'm going to add some shadow to the grass next, and then finish the lions' limbs. Also notice the dark spot behind the male lion's head. I am going to make the whole background dark like this to bring the lions out. That will take a while because the pen needs to be very hot and the heat transfers to your fingers so you have to stop frequently to let it cool off a bit.

Friday, October 24, 2008

2009 Calendars

wildlife drawing calendarRedBubble has recently started to offer calendars, so I put one together. It is a collection of most of my black and white work. Take a look.

As an added bonus, order by October 30th and enter the promotion code 100000masterpieces to get free shipping.

Thursday, October 16, 2008

Woodburning a Lion's Face

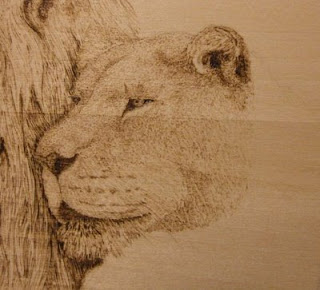
lioness pyrography in progressI have worked on the lioness a little today and thought I'd share my progress. In this first step, I used the ball pen to add the short nose and forehead fur by stippling. With less heat, I went over it with a light touch to add some extra shading. For the cheeks, I used the extra small round skew with light heat and short strokes. I also darkened the male's mane to bring out the female's face.

lioness pyrography in progressIn this second phase I used the ball again to add structure to the rest of the face, using mostly stippling and tight squiggles and light heat. The shadow of the ear required medium heat to achieve the dark value, and I scribbled the ear fur in.

Here is where I stand at the moment. The short chest and shoulder fur was done with the small skew on light heat following the direction of the fur. I'm going to darken the mouth a little, and probably the male's mane a little more, then I'll continue in this way with the rest of the body.

Wednesday, October 15, 2008

Drawing with Fire

lion drawing pyrography in progressPyrography, from the Greek for "fire writing," is the the process of burning material (such as paper, leather and gourds) to make art. The only material I have tried so far is flat wood (one could also used carved wood, bowls, etc.). Special pens are used that come a large variety of shapes and sizes for achieving different strokes. For example, the skew is great for straight lines, the flat shader is best for shading, and the ball is perfect for writing and scribbling. The pens are hooked onto a generator that heats up the point. The amount of heat is adjustable to achieve different shades of burn.

Drawing with these pens is like a combination of ink and graphite. You can get a wide variety of shades like graphite (by adjusting the heat), and you can make it so you can't see the individual strokes (like blending). But like ink, it is indelible, unblendable, and unforgiving. If you make a mistake, you can scrape the char off with a knife, but that usually leaves a deep scratch on the surface.

I was given the reference photos for these lions by an artist friend of mine (the same who gave me references for the warthog and Mexican wolves) who got them from a photographer at the Cincinnati Zoo. White lions are very rare, and like white tigers they are not albino, just very lightly colored. I thought they would make a perfect subject for a woodburning.

In this photo the male lion is mostly finished. I still have his forearms to do, but there will be grass partially obscuring them and I want to save that for later. I am working on the female to give you an idea of the process. I start with the eyes, nose and mouth using the ball pen on a medium heat setting. By turning the heat down, I can get the lighter brown for the irises of the eyes. In the next couple days, I'll work on the rest of the face and post another update.

Friday, October 10, 2008

Announcing Limited Editions

Beginning today, I will start offering limited edition prints of my drawings, beginning with this turtle. Editions will be of only 25 and will be signed and numbered. You can purchase them directly from my website with PayPal. I chose this one because I think it is the best I have to offer that have not sold open prints yet. I hope to add more with future drawings.

Monday, October 06, 2008

On the Drawing Board

I've been pretty busy lately moving my website over to my own domain name (finally!) and updating all my links to it from all the art sites I belong to, not to mention some personal things that got in the way. I haven't had much time for drawing or blogging as a result, but all that is done for now. So, since I don't like to go so long without a post, I'll just explain what's in progress.

First of all, yes I'm still working on the colored pencil coral reef drawing. It has taken a back seat of late, but I plan on increasing the time I spend on it in the next few months. I figure I'm about a third done, and the next few species to add will be branch coral (probably white), the red lionfish, and then an anemone or two.

Next, I have laid out a very large pair of zebras. I'm really excited about this one, and I wish I had more than a sketch to post of it. I found a large piece of gray matboard hiding in the back of my closet, and I am going to use both black and white charcoal.

I like to have a small drawing going, too, so I can feel some accomplishment while the larger drawings take so long. This one is in sketch phase - I still haven't finalized the pose - but it will be a pair of sand cats. Sand cats are one of the smallest species of wildcats in the world and live in the deserts of the Middle East and northern Africa.

Then I have a still-life in pause right now. I was meditating on how I could improve my drawing and this still-life flashed before me. It took a few weeks to get all the materials and set it up, and I've sketched it on the paper I'll be using, but I haven't had the motivation to start. It could be that still-lifes (still-lives?) just don't interest me, or it could be that I don't know how to start, or it could be that I'm a little nervous about treading on unfamiliar territory. But it has been started, so I'm at least going to finish it.

And finally I'm working on a series of step-by-step drawings of various animal textures in pencil and charcoal that I will put into drawing tips and tutorials and, with any luck, a book. I've done a few eyes and feet so far, and I'll be sure to put lots of types of fur in, too. I figure all the drawings should take me close to a year to finish, and then a few months to add text. It will be great practice for me, too. And yes, there will be a page for the indenting method, I just haven't done that one yet.

So I apologize for not having any photos to post, but it seems that most of my work is in the early phase of completion. Next time, definitely.