 This long-eared owl was rescued by The Wildlife Center of New Mexico after a wing wound that healed poorly. The owl had surgery and healed, but cannot be completely rehabilitated and released. He has been trained, however, to be an educational animal. A portion of my profit from the sale of this piece will be donated to The Wildlife Center. You can purchase it through my website.
Blog of scratchboard wildlife artist Heather Ward.
Comments about new and upcoming work,
book reviews, and tutorials.
Friday, January 30, 2009
Long-Eared Owl Pyrography
 This long-eared owl was rescued by The Wildlife Center of New Mexico after a wing wound that healed poorly. The owl had surgery and healed, but cannot be completely rehabilitated and released. He has been trained, however, to be an educational animal. A portion of my profit from the sale of this piece will be donated to The Wildlife Center. You can purchase it through my website.
Tuesday, January 27, 2009
Drawing Tip #19: Blending Tools
 One of the most important parts of drawing ultra-realistically is using the right tool at the right time. I mentioned using the right paper in a previous post, and the differences between charcoal and graphite in another. In the image here I use a 6B charcoal with different types of blenders to show the different effects. In a future post, I'll show different erasers.
The top is the blending stump - tightly wound soft paper with points at both ends. You can use the point or the side to blend, and they come in a variety of sizes. I use the smallest one the most, because I can get into very small areas with it. To keep it clean after use, just drag it backward on clean sandpaper, rotate and repeat until you have a clean point. I use blending stumps for fur or any small detail area.
Next is the tortillon, similar to the stump in that it is rolled paper with a point. The paper is a little rougher and it is less tightly wound than the stump, and tortillons have only one pointed end. Cleaning and sharpening is the same, with sandpaper. I just recently found these are great for penguin feathers.
Paintbrushes are a unique tool for charcoal work. I have two in my pencilbox: one with a typical round tip and one with a flat angled tip. I used the latter in the image because it is firmer. The round-tip brush is softer and has a very gentle effect. I have used paintbrushes by dipping them in charcoal powder and applying it to the paper for smooth areas.
The chamois leaves a very smooth texture, but it does pick up a lot of charcoal, making the area much lighter. I like to use chamois for backgrounds mostly, and for applying charcoal powder to the paper in large areas.
Finally I like the tissue for smoothing out backgrounds. Put a thick layer of soft charcoal and blend in circles with the tissue. Tissues don't pick up as much charcoal as the chamois, so the area stays darker. Use plain tissues, not anything with lotion or antibacterial whatever in it.
Don't use your fingers for blending. While it is a common practice, the oils from your fingers will get on the paper and change how the charcoal looks over time. In fact, I do my best not to touch the paper at all, even holding it with cotton gloves when I need to move it to keep from getting fingerprints.
I find it takes a lot of experimentation and even a bit of intuition to find which tool will work best in a new situation, and I'm always on the lookout for new tools to use.
Monday, January 19, 2009
Bobcat Finished
 Here he is, my first drawing of the new year. I met this bobcat on a recent visit to the local wildlife hospital and rescue center. Most of the animals there were being rehabilitated after injuries or being raised as orphans. The four adult bobcats were healthy enough to return to the wild, but they had been "humanized" - meaning they associate humans with food and shelter. Instead of being set free, the two pairs stay as foster parents to any orphaned or injured baby bobcats to minimize human contact. I will be donating a portion of my profit of sales of the original and limited edition prints to The Wildlife Center of New Mexico where this cat lives.
Friday, January 16, 2009
Drawing Tip #18: The Indent Method
 I've mentioned this "indent method" several times in past posts. Finally, here's a thorough explanation. The basic idea is to put a deep indent into the paper, so that when you draw over it with charcoal or graphite the indent leaves a white line. Any material that accidentally gets into the groove can be lifted out with a pointed kneaded eraser.
You can use many tools to make the indent, so long as they don't leave a mark. Possible tools include a stylus, an empty pen or mechanical pencil, a toothpick, or a hard well-sharpened pencil over tracing paper. Test your tool on spare paper first to make sure it doesn't leave any mark.
 The fist image is of the bobcat's whiskers indented before any drawing was done. Since whiskers are important to leave very white, press very hard when indenting. You can get an idea of how hard by looking at the shadow on this photo. (Click the photo for a larger version.) I used a 2H graphite pencil over a piece of tracing paper. Now you can draw with a light touch right over the indents without getting pigment inside the groove. And after the fur was drawn in, I ran the kneaded eraser along the whiskers to pull out any charcoal that got inside. Then I traced along the lower edge with the 2B pencil to add a light shadow.
 In this last shot there are two things going on. First is the white whiskers above the eyes. I used the same method to indent as for the cheek whiskers, but instead of drawing over them, I dabbed the charcoal on with a chamois. This got a lot of charcoal in the grooves, but the kneaded eraser took care of that. The second point of this photo is the other application of the indent method - the small scale. I used an empty 0.3mm mechanical pencil to scratch fur in place. The length of the scratch is proportional to the length of the fur, and the depth is much more shallow than for the whiskers. Then I can draw over it just like the whiskers, but the white lines are smaller. Blending with a small stump puts a little charcoal into the grooves, but in this case it is desirable because I don't want pure white marks.
This technique will work in graphite as well as charcoal, and it is one way to make your fur drawings more realistic. Experiment with it to see what works for you.
Tuesday, January 06, 2009
WIP Reef - Sea Whip and Clown Triggerfish

Since I got my new large easel, I've actually managed to do some work on my coral reef drawing. Today I have two new species, the sea whip coral and the clown triggerfish, plus a mass of random greenish hard coral base.
 Sea whips (family Ellisellidae) are a soft coral that grow in long, spindly branches. In the order Gorgonacea, they are closely related to sea fans and are often brightly colored. To get the bright orange color, I used Spanish orange, poppy red and Tuscan red.
The green base under the sea whip was achieved with cool grey 20%, 50% and 90%, olive green and dark green, blended with the blending pencil. It's starting to make the red soft coral stand out a little.
 The clown triggerfish, Balistoides conspicillum, is one of several species of triggerfish. It is identified by its black body, white spots on its belly, yellow mouth, yellow with black spots on its back, and a white stripe on the tail. The coloring helps it blend in to its environment. They can grow up to 20 inches long. Their diet consists of sea urchins, crustaceans and mollusks. I used several shades of cool grey, black and white for the main part of the body, yellow ochre and deco yellow for the yellow parts, and a combination of light cerulean blue, cool grey 20% and 50%, and white for the fins.
Next up I think will be a few brain coral.
References:
http://www.encyclopedia.com/doc/1E1-seawhip.html
http://en.wikipedia.org/wiki/Balistoides_conspicillum
Saturday, January 03, 2009
Looking Back, Looking Ahead
 The beginning of the year is often the time to look back over the past year and make plans for the coming year. I'm usually not one to do this, but for some reason, this year I did. I thought I'd share some really old stuff of mine to compare to my recent work. I have a sketchbook going back 15 years (half my life, gasp!). This little bunny, for example, I drew while watching Captain Bob. Way back then, Captain Bob was a drawing show for kids at the ungodly hour of 6am Saturday morning. I would set my alarm and get up to draw the animal of the week.
 About the same time I drew this carousel horse. While I cannot remember exactly, I'm pretty sure I came up with it on my own. I drew a lot of horses around that time, in addition to dinosaurs and, dare I say it, Teenage Mutant Ninja Turtles.
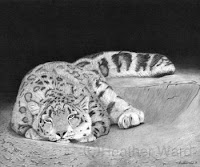
 After middle school, my efforts focused on academics. In fact, I did very little drawing from high school until about five years ago. I tried out a few media: pencil, ink, pastels. Last January I drew this greyhound for donation to a greyhound rescue center. And then I read Drawing Realistic Textures in Pencil. The book opened my eyes to the potential of pencil and charcoal. My very next drawing was the snow leopard.
Over the past year, I have progressed to the point of my current favorite, the gorilla. But I'm not completely satisfied. With the help of overcoming another mental obstacle (kind of hard to explain), I think I'm taking the next step with my art as evidenced by my current piece, the bobcat. My work will be taking longer, but I will post in-progress work periodically. (I also got a nice, big easel for Christmas that the coral reef actually fits on, so I'll be working on that more, too.) I think the coming year will result in even better work. Stay tuned...


Subscribe to:
Posts (Atom)