Sunday, August 31, 2008

WIP Reef - Sea Fan

coral reef drawing in progress
Back to the coral reef for a while. The most recent parts are the beginning of a red lionfish (which I realized after I started is behind the coral) and a green sea fan. Sea fans belong to the order Gorgonacea, and like many of the corals I've been drawing the specific scientific name is difficult to pinpoint. Sea fans come in a variety of colors, usually orange, purple or yellow. The colonies organize themselves into a fan-like shape (hence the name) in a single plane to filter plankton out of the water as it flows through it. When the polyps are retracted, the coral looks more like a branch. Sea fans prefer to anchor in sand and can grow up to five feet long.

sea fan drawingDrawing this sea fan was simple, but required a steady hand. I used a base layer of peacock blue and a top layer of dark green for the skeletal structure, fading into aquamarine and olive in the lighter area. I used light aqua for the polyps and light cerulean blue for the hint of water you can see behind it.

I'm going to build up a little more of the hard coral below it, but I want to put in the block of branch coral first. I had started a lionfish because I figured I hadn't drawn a fish in a while, but since I'm working foreground-to-background, the rest of the fish will have to wait.

References: http://en.wikipedia.org/wiki/Sea_fan
http://www.samford.edu/schools/artsci/biology/bahamas/reefs.html

Thursday, August 21, 2008

Drawing Tip #16: Fur, Part III - Short and Long Fur

This is a long time coming, but I've finally done a demonstration just for this blog on how to draw fur. Long fur, in this case. I hope to do others for different kinds of fur. I am using Strathmore 300 series 70lb drawing paper. It has enough tooth to hold the graphite and charcoal, but not too much to be difficult to add detail. The subject is a Maine coon cat, noted for their size and long, flowing fur.

maine coon cat step 11- In the first step I have already drawn in the facial features. You can't see it, but I have also indented the paper with a stylus where the whiskers will go. My layout sketch is so light it doesn't show up, either.


maine coon cat step 22- I use a sharp 6B charcoal pencil for the fur, varying the pressure with the shade. I begin around the eyes. This is very short fur, so my strokes are also very short. I work the bridge of the nose with small, circular strokes with a very light touch. I blend with the same motion using a small blending stump. The left side is the blended charcoal, the right side is unblended. Note in particular that the characteristic M marking on the forehead is not made up of strokes following the M shape, but rather following the fur making up the pattern.


maine coon cat step 33- I continue to add fur with the 6B charcoal pencil and blending stump. The length of the strokes must match the length of the fur (proportionately, of course). As the fur goes away from the eyes, it gets longer. I fashioned my trusty kneaded eraser into a wedge and dragged it along the fur direction to add highlights, keeping the same stroke length. Finally, I went back over the area lightly with the 4B charcoal pencil to add random marks (random, but again along the fur direction) to add a little more texture to the fur. I also used the kneaded eraser to dab at the bridge of the nose to lighten it.


maine coon cat step 4
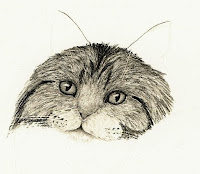
4- More of the same. Notice how the fur is getting longer as it goes away from the eyes and down the cheeks. For the white fur around the mouth and chin, I applied the charcoal directly with a blending stump. The best way I've found to do this is to grind up some charcoal using sandpaper, then dip the stump in and tap it to get rid of any excess. Use the kneaded eraser to pick up any stray specks.


maine coon cat step 55- I used the kneaded eraser (dragging in wedge form) to lighten the areas just below the eyes and to erase the smudges that got onto the whiskers (make a real fine point or wedge and it will fit right into the indentation). I also started the ears with the 4B charcoal pencil - small circles at the tips and leading edge, light long lines to create the negative space for the white ear fur.


maine coon cat step 66- Here I added more fur between the ears and at the back of the head to fill out the head shape. I also lightened the rest of the cheeks with the kneaded eraser. For the ears, I used the blending stump to smooth out the charcoal. Drag the stump from the outside in to create the ear fur and use the kneaded to touch it up.


maine coon cat step 77- The chest fur is all white, which is once again best applied with a dirtied stump. The Maine coon cat has long chest fur, so use long strokes.


maine coon cat step 88- Here I've finished the chest fur by adding more charcoal to the right side to create shadow.


maine coon cat step 9
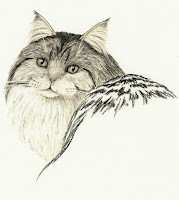
9- Switching tactics a little, I used the 6B charcoal pencil to add the shadows of the fur on the back. The fur on the top is fore-shortened, so it looks shorter and we can see the fluffiness better - this means the shadows are closer together. Use strokes that flow down the back.


maine coon cat step 10
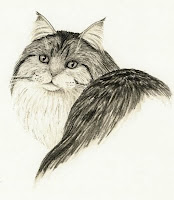
10- In between the dark shadows, I used the same pencil with a lighter touch to add the rest of the fur. It's okay to leave white patches here and there, so long as they aren't too big. I went for my medium-sized stump to blend it all. The size isn't so much the trick as the condition it's in: it's worn down, almost frayed, so that it has a real soft touch. You could also get this effect with a chamois or felt or other soft blender, but the stump has the added benefit of being small and easy to manipulate.


maine coon cat step 1111- More highlights with the kneaded eraser. To the back fur, once again make a wedge and drag it along the fur to lighten an area. I thought the cat would stand out better with a darker background, so I applied charcoal dust with a chamois. I then used - you guessed it - the kneaded eraser to drag the white fur (chest and ears) into the dark background. (Don't mind the spots on the left, they are fingerprints and I'm working on photoshopping them out.)


I hope this has been a useful tutorial. I would love to hear from you as to how easy this was to understand, where I could improve, and any other comments. Ultimately, I would like to put together a bunch of tutorials like this into a book.

Wednesday, August 20, 2008

Multitasking

Up to now, when I started a drawing, I worked on just that piece until it was finished. I discovered, however, that by the time I near the end, I start to rush. Sometimes I am looking forward to the next drawing already, sometimes I'm just tired of working on the current one; either way, rushing makes a poor drawing even if it started out okay. As I mentioned in a previous post, the simple act of expecting the drawing to take a really long time did wonders for my patience and my artwork. I want to keep improving, so I figured I had to find a way not to rush it.

An artist I know (the same who proposed the Mexican Wolf challenge) told me she works on several pieces at a time, all in various stages of completion. She recommended having at least three, each in a different medium, for starters. So I have my coral reef, which is colored pencil, I always have a charcoal/graphite drawing in progress, and for my third I chose to go back to ink. Three drawings, all different media and different subjects, one almost done, one part-way, and one just beginning. And it has had a profound impact on my patience. Realizing and accepting that they are long-term projects, that they will not get done anytime soon, and that what's most important is that I am satisfied with the results has indeed pushed me to the next level I was hoping for.

Saturday, August 16, 2008

Moonrise Message

raven drawing in white charcoal
I like white charcoal. Back when I first started experimenting with it, I had several ideas come to mind, most with white tigers, but also a few night scenes. This was one of them. The challenge in this drawing was not the animal as in most of my work, but rather the moon. I tried to get it as close as possible to the real thing without getting overly detailed. This paper has a patterned tooth that I find difficult to do detail work with.

The bird in the image is a raven. Ravens are very common in North America, and many native traditions believe the raven is the messenger of the spirit world. This raven is calling out a message for those who would listen. I liked the idea of the black bird silhouetted against the bright, full moon.

Prints and the original are available.

Wednesday, August 13, 2008

The Blackest Black

Since I don't have any new art to unveil, I thought I'd share an article I read a couple months ago. My Alma Mater is co-creator of the world's blackest material. Made of carbon nanotubes, the material reflects 30 times less light than the previous blackest material; the degree of blackness is determined by how much light is reflected and how much is absorbed. Carbon nanotubes are microscopic tubes built out of carbon atoms. Future research could lead to material that absorbs all light directed at it, or an "invisibility cloak" that bends light around the object behind it. Read the full story here.

Wednesday, August 06, 2008

Gentle Giant

African elephant graphite pencil drawingThis is my first strictly graphite drawing in a while. I thought the skin texture of the elephant needed something a little grayer. It was a little different for me, drawing an animal without fur or feathers, but I like how this came out much better than the rhino from a few months ago.

Drawing wrinkles is tricky. You can't get them too dark, or they look too deep. You can't just draw a line, either. Depending on the orientation of the wrinkle with respect to the light source, there is usually a dark side going into it, then a light side coming out where the light hits. You have to get both just right (and consistent) for it to look real.

I used mostly the HB, 4B and 9B pencils with the tortillon for blending. I also used the indent technique for the eyelashes, to make sure they stood out lighter than the background.

The original is for sale and prints are available.

Saturday, August 02, 2008

Drawing Tip #15: Keeping Pencils Sharp

Keeping your pencils sharp is key to doing detail work. That can be easier said than done - some pencils (like charcoal) wear down so fast you'll wonder if it's worth it to sharpen at all. Here are a few tips for keeping those pencils pointy:

Graphite pencils:
Usually the electric pencil sharpener is sufficient for these, even the softer leads. But if that 9B is stubborn, try a manual sharpener or a knife (always slice away from your body).

Colored pencils:
I'm sure an electric sharpener would be fine for colored pencils, but I prefer to use the tiny hand sharpener that came with the set. If your pencils have a penchant for breaking (and apparently Prismacolors do), it's better to use a hand sharpener so you can better control the torque you put on the shafts.

Charcoal pencils:
I found out quite early that I cannot use an electric sharpener with charcoal, especially the 6B. I can use a hand sharpener, but it still doesn't get it nice and pointy. The only way I've found that works is to use sandpaper. Sharpen by hand as far as it will go, then drag it backward along fine sandpaper, rotating and dragging again, until it is the desired sharpness. The knife would also work, but charcoal chips easily so just shave very lightly.

Carbon pencils:
My hand sharpener works pretty well with the carbon pencils. If I just can't get that extra pointiness I need, I'll use a knife or sandpaper to hone it.

The added benefit of using sandpaper with charcoal or carbon is that you end up with a pile of charcoal or carbon dust, which is great for picking up with a stump, blending cloth or tissue to apply directly to the drawing.

Gallery Exhibition

Last night was the opening reception for a local exhibit I was accepted to. The title is "Members' Best" and is a juried exhibit of the best work of members of the gallery. There was a large variety of media, subjects and styles, and I was the sole representative of charcoal. I had a lot of good response for my turtle, including one guy who asked me if I was a photographer. Here's the official exhibit site. (This link will likely only last through the end of the show on September 6.)