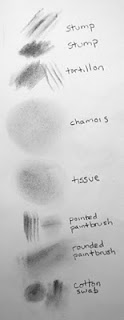
I have divided the tools I use for applying charcoal into three categories: blending stumps and tortillons, tissue and chamois, and paintbrushes and cotton swabs. Click on the image to view it larger. I went a little dark on these samples, mostly to show the texture you can get. Just use less charcoal and a lighter touch and you can get almost imperceptibly light areas.
I have found the best way to apply charcoal is to start with charcoal powder. You can buy it by the jar, but it is easy to make your own by grinding a stick (don't waste the expensive pencils on this) or vine with fine sandpaper and collecting the powder in a vessel.
 Stump/Tortillon: With stumps and tortillons, you can also use the stick or pencil charcoal to draw on the tool to greater control how much charcoal gets used. Use the side of the blenders in a circle to get a smooth texture, or drag it along to get streaks or other textures. Use the point to get into small areas.
Tissue/Chamois: I don't use the tissue much, but if you don't have a chamois, it's the next best thing - it just has a slightly rougher result. Using the chamois with charcoal powder on it (not much, mind you, a little goes a long way) is how I do sky. Often, I need a very light but uniform base, and no amount of blending charcoal applied directly will do it, even on extra-smooth paper. You will get a bit of charcoal pieces, especially if you used rough sandpaper, but just move the chamois around in circles and it will even out. These tools are best used on large areas.
Paintbrush/Cotton Swab: The cotton swab is a new tool for me, so I haven't had much opportunity to use it, but in playing with it, it seems easy to get small areas of very light to very dark smooth texture. I have two paintbrushes: one with a soft round tip and one with a slightly firmer angled tip. The rounded paintbrush is great for adding small areas, and it is fairly easy to grade from light to dark. I use this brush for adding value to skin. The angled or pointed brush is great for getting into tight spaces or drawing flowing hair or distant tree trunks. The most important thing to remember with paintbrushes is to tap off the excess powder before you touch the drawing. I will often tap it on a paper towel or tissue to make sure the charcoal bits don't get on the drawing and produce streaks. Another way to keep this from happening is to use the dust from the powder. Close the container tightly and gently shake it to make the powder cover the sides (and top if you wish). You can then use the brush to take charcoal dust off the sides or top with little risk of getting large charcoal bits.
Take some time and some spare paper to experiment with using different tools to apply charcoal powder. You will increase the range of values you can achieve while keeping the texture interesting.
6 comments:
Love your art and your tips, thanks so much.
Thank you, I'm glad you like them!
Thanks, Eric. I'll take a look.
Thanks for sharing your tips this is a great site
Thank you, Russ. I hope that my tips are helpful.
Post a Comment