Friday, April 25, 2008

Drawing Tip #11: Fur, Part I - Fur Direction

There is no way I can describe how to draw fur in one post, so I'll lay down the basics first. Look at any animal with fur and you'll notice that the fur goes in a certain direction. The body is obvious, it starts at the head and goes down the back, down each limb, and down the tail. The head is much more complex: fur goes from the base of the ears to the tips; around the eyes starting at the tear ducts; sideways along the cheeks; and from the nose to the forehead. It is the intersections of these areas that can be difficult to determine fur flow. Look closely at any cat or dog between the nose and one eye. There is a point where the fur reverses direction (see image).

Now, that being said, from some angles and in some poses, parts of the fur may appear to be going the wrong way. This is where the fur is lifted or twisted by the muscles underneath or because of the perspective. Take, for example, my koala. In the dark areas on the right arm, the fur has been lifted up and casts a dark shadow. It appears to flow from the base UP to meet with the fur above it. In my cat drawing, the chest fur goes in all sorts of directions. It is essential to incorporate these variations or the drawing will not look real.
If the animal has a short coat, like a deer or horse, there will most likely be none of this. Short coats don't fluff up - they lie flat against the body (but you'll probably still end up with that wierdness around the eyes).

Even if you are working directly from photographs, it helps to have familiarity with the pattern of fur of the animal you are drawing to ensure you get it right.

Wednesday, April 23, 2008

Is That My Dinner?

This was a quick drawing. I took the photograph it is based on last week sometime, and thought it was so cute I had to draw it. This is one of my two cats doing what she does best - waiting for dinner. I'm trying to find some interesting poses, and I thought this worked rather well. I also wanted to use it as a fur study.

The original is charcoal on 70lb drawing paper, 10"x14", and it went so smoothly I finished in only two hours (it's also a lot smaller and simpler than my other drawings). I used the 6B charcoal for the black and tan fur, the 2B for the nose and eye, and a smudged stump for the white areas.

Prints are available, but I'm keeping the original!

Tuesday, April 22, 2008

Catamount

cougar drawingThe cougar is finished. I decided to call it "Catamount" because that is the name I hear least of its many names. I considered a few other titles, but I liked this one best.

I'd like to stay away from doing portraits like the tiger and do more interesting pictures. I came up with this idea several weeks ago, with the cougar up in a tree looking down, crouching. The pine trees were interesting to draw, yet surprisingly easy. I used the 4B charcoal pencil, making dark lines for the gaps in the bark, then a lighter touch with random directions and textures for the rest.

This was a fun drawing to work on. Total time: 13 hours. Prints are available.

Friday, April 18, 2008

WIP - Cougar

cougar drawing in progressI started working on the cougar a few days ago. The beginning of one eye is in the previous post, and here it is finished. The eye, that is. The head is mostly done, but I will probably go back and add extra shading later. This is a detail view, as the drawing will be much larger. I don't want to spoil it, but this guy is in a fairly unique pose, even if it doesn't seem like it now, and there'll be some background. I'm still trying to think of a title.

Last post I also mentioned that I am moving towards the 6B charcoal more and more, but I found myself preferring the 4B for the fur here. I use small scribbles and then blend with a small stump in the same manner. It's a great method for doing short fur.

It looks like this weekend will be busy for me, so I might not get a lot of drawing in. Hopefully I'll finish this by the middle of the week, but I'm not going to rush it.

Tuesday, April 15, 2008

Drawing Tip #10: The Eyes Have It

Most animal artists I have read about say the eyes are the single most important part of an animal drawing. Many, including myself, begin each drawing with the eyes. That way, if they do not turn out right, it's easy to start over. The eyes are not just the organ of vision, they also contain a lot of the expression. So to get a good drawing, it is essential to get the eyes right.

wolf eyes drawingDifferent types of animals have different types of eyes. Look at the predator eyes of a cat and a bird of prey. Then look at the eyes of a rabbit or a deer. They are all fundamentally different. Predators have eyes that look forward, while prey eyes look to the sides. The pupils must be positioned so the animal appears to be looking in the direction you want. If the head is not viewed straight-on, one eye will be partially hidden and foreshortened (in the case of an animal with forward-facing eyes). The pupil may not be in the same relative position as in the other eye because of this. Sometimes the shape of the cornea will distort the view of the pupil. Be sure to incorporate this - don't necessarily give your pupils a hard edge.

deer eye drawingDon't forget the glint in the eye. The glint is very important for adding that element of vitality to a drawing. Since the cornea which reflects the light is round, try to show this in the glint (unless the glint is small). In close-up drawings of eyes, be particularly detailed. Sometimes you can actually see the surroundings reflected in the eye. Also give some texture to the iris if the eye is big in your drawing. The iris is like a muscle that contracts and relaxes to change the size of the pupil. Make it radiate from the center.

tiger eye drawingThe tear duct is often overlooked. It is a simple little buldge at the inner corner. Depending on the direction of the light, you may have to add a little highlight on it. Lower eyelids often have a thin highlight as well. Upper lids are often covered in short fur and have eyelashes. Don't forget the shadow from the upper lid and eyebrow area.


cougar eye drawing
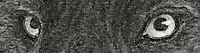
This is the beginning of the cougar drawing. I am pleased with how this eye came out. I am starting to use the 6B charcoal pencil more and more because I like its darkness and maleability. I blended each part of the eye with a tortillon, then added the highlight to the lower lid with the kneaded eraser formed to a wedge and pulled. I started adding the fur with the 4B, but more on that in another tip to come.

If an eye is small, I will use a hard pencil (H or 2H) and blend for the iris. It's easier for me to get into those tiny areas.

Black on White

black rhinoceros charcoal drawingI finished the rhinoceros yesterday, and I have to say, it's not bad, but I'm not entirely happy with it. I gives me the same feelings as Polarity. I'm trying to move beyond copying my photographs and using a collection of reference photos, but it just didn't work this time. I'd like to try another rhino in the future, though. And I still have prints available.

So this guy is a black rhino. They have the pointy upper lip, whereas the white rhinos have a square lip. This drawing is completely charcoal, with 6B used for almost all of it except 2B for the hairs on the ear. To get the texture of the skin, I covered with the 6B, blended with the side of a large stump, and then smeared it with a very dirty kneaded eraser. I'd like to write up a drawing tip with that technique sometime.

With that, on to the cougar...

Friday, April 11, 2008

Upcoming drawings

Thanks to those of you who voted in the most recent poll. There were twice as many votes as in the first one! However, we did end up with a tie between the cougar and the rhino. As I decided a few days ago, ties (in which I did not cast a vote) will not be broken: I'll do them both. Since the rhino took an early lead, which made me start setting up a composition in my head, I'll start with that one, then do the cougar. I'm also working on a "surprise" drawing that I won't reveal until it's finished. In the meantime, you can vote in my long-term poll for what general types of animals you'd like to see in the future.

Tuesday, April 08, 2008

Most Ambitious Project Announcement

It is with both excitement and trepidation that I am announcing my most ambitious project yet. I plan on working on this in between other, shorter drawings, to give myself a little variety. I bought a piece of quality paper 30" wide - the biggest by far I have ever used. I don't remember the height, but I'm thinking of cutting it down to 15-20". This will be a colored pencil drawing. And I'm sure it will take several months.

Do I have your interest piqued? I'm going to attempt an underwater coral reef scene. I've started researching the different types of corals, fish and other plants and animals that live in Australia's Great Barrier Reef. I picked there just so I can localize the sealife.

So far, there's nothing to show except a big empty piece of paper. I'm working on the composition now, and once I get that finalized I'll post it. Stay tuned!

If the Poll is Tied

With one day left to vote in the poll for what I draw next, I find it in a tie. So I figure I should decide what to do in case it ends up that way. (Please vote to break the tie!) I have come up with the following resolution.

1) If I voted for one of the two, I will go with the other one. I mostly vote to get it started, and I'd rather draw what people want to see.

2) If I didn't, I am not going to extend voting or hold a run-off. This is partly because I get impatient to start a new project and partly because I don't get a lot of visitors and voters yet (mostly the latter). So, I will most likely do both winners.

3) If it's a 3-way or 4-way, I'll figure that out later.

Friday, April 04, 2008

Sunbathing

green sea turtle charcoal drawingWell, here he is: my first reptile. I did this entirely with charcoal, and it was surprisingly easy considering I had no idea what I was doing. I'm starting to get a feel for what the different pencils (charcoal and graphite) can do and which to use when. After I finished the turtle, I was afraid to start the background for fear I'd ruin it. For so long I've been drawing animals on a plain white background, I don't know how to draw rocks and trees and sand. But I sat and thought about it and could visualize how to go about it. The charcoal blends easily to give a nice even tone, but also leaves enough flecks to look like grains of sand. It is also easy to knead away areas of reflection in the smooth, wet area.

Prints are ready. The original is 17"x7" and I'd like to get it framed in the near future.

I'd like to thank my sister for giving me the photograph I worked from.

Edit 06-08-08: The original piece will be featured in a gallery during August, 2008.

Thursday, April 03, 2008

Drawing Tip #9: Take Notes

It may seem obvious, but when you're experimenting with different combinations of pencils and blenders and techniques, write down what you did. Make quick notes: Which pencil? How hard did you press? What kind of stroke? Which blending tool? What order did you do it in? The more layers you add, the less likely you are to remember them later. So write it down. It'll help you remember not only what works well, but also what doesn't.

Wednesday, April 02, 2008

WIP - Sea Turtle

I decided to go against my usual method of always starting with the eyes, and instead started with the shell. After about three hours, I am just about finished with it. I used a base of 4B charcoal blended with a tissue to get the underlying tone, then added more to get the darker areas and blended with a stump. I went back over the dark areas with the 2B charcoal to get it nice and dark. I was a little worried that charcoal might not give it the wet, shiney appearance I wanted, but it seems to work. (Remember, this is my first reptile.)

This drawing is half the size of my previous works, so I expect it won't take as long. Now that the shell is done, I'm going to work left to right and do the hind flippers first. I'll save the sand he's lying on for last.